

What are Hooks?
React Hooks were introduced in React 16.8. React Hooks are functions that allow you to use state and other React features in functional components. They were introduced to simplify state management and side effect handling. Before hooks, these functionalities were primarily available in class components.
⚡useState
It is one of the most commonly used React hooks, and it allows functional components to manage and update their own state. State is used to represent data that can change during the lifetime of a component. useState re-renders the component when the state changes.
Syntax
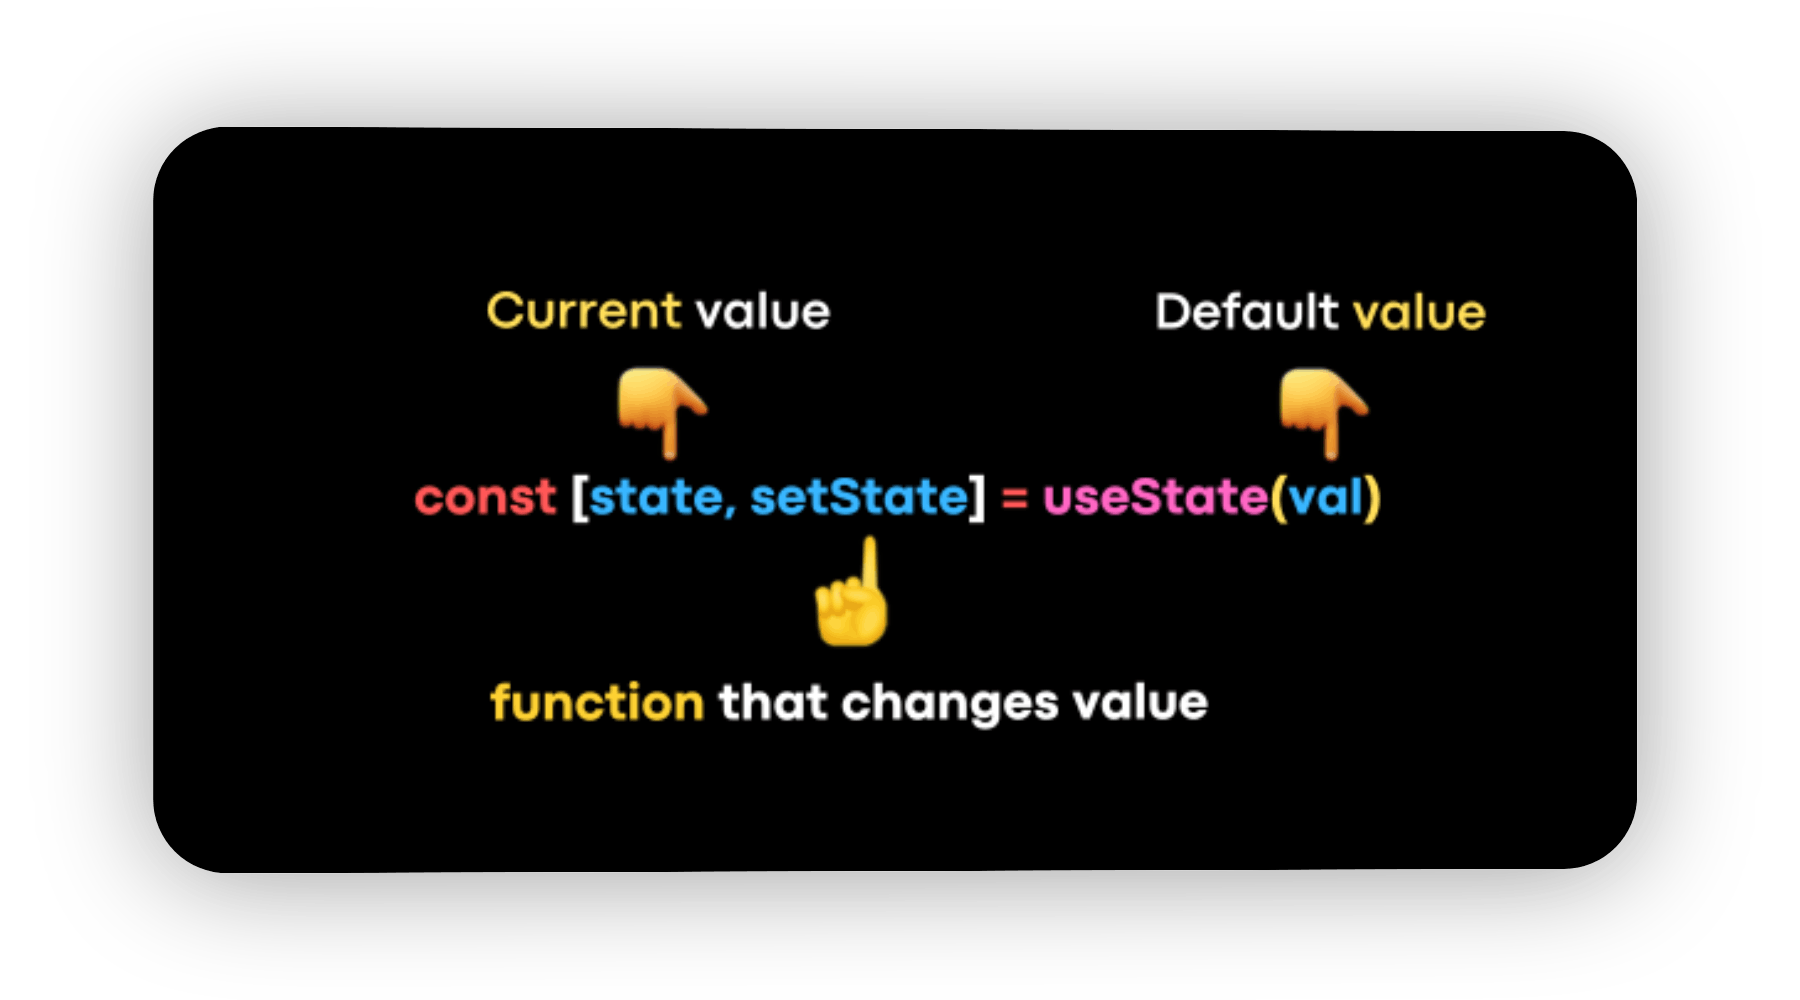
useState returns an array, the first element in array is the value of state and second value in array is a function, which when destructured looks like this. The default value can be anything boolean, number, text, array, object. The function is used to update the state, whatever value we pass in the function will be state of the variable.
useState using default value as numbers, text
useState using default value as Objects
Here the state keeps track of input value & how many times the button has been clicked and saves it as memory.
Whenever it updates, the related section is re-rendered. The <h1> tag is being rerendered every time the user types some text (or) clicks the button.
👾useEffect
useEffect allows you to manage side effects in functional components. Side effects are operations that are performed with the external world, outside the react components.
Some common side effects are:
Fetching data from API,
Updating DOM document
Timer functions (
setTimeout&setInterval)Subscription handling.
Here's how the useEffect hook works and how you can use it:
Syntax
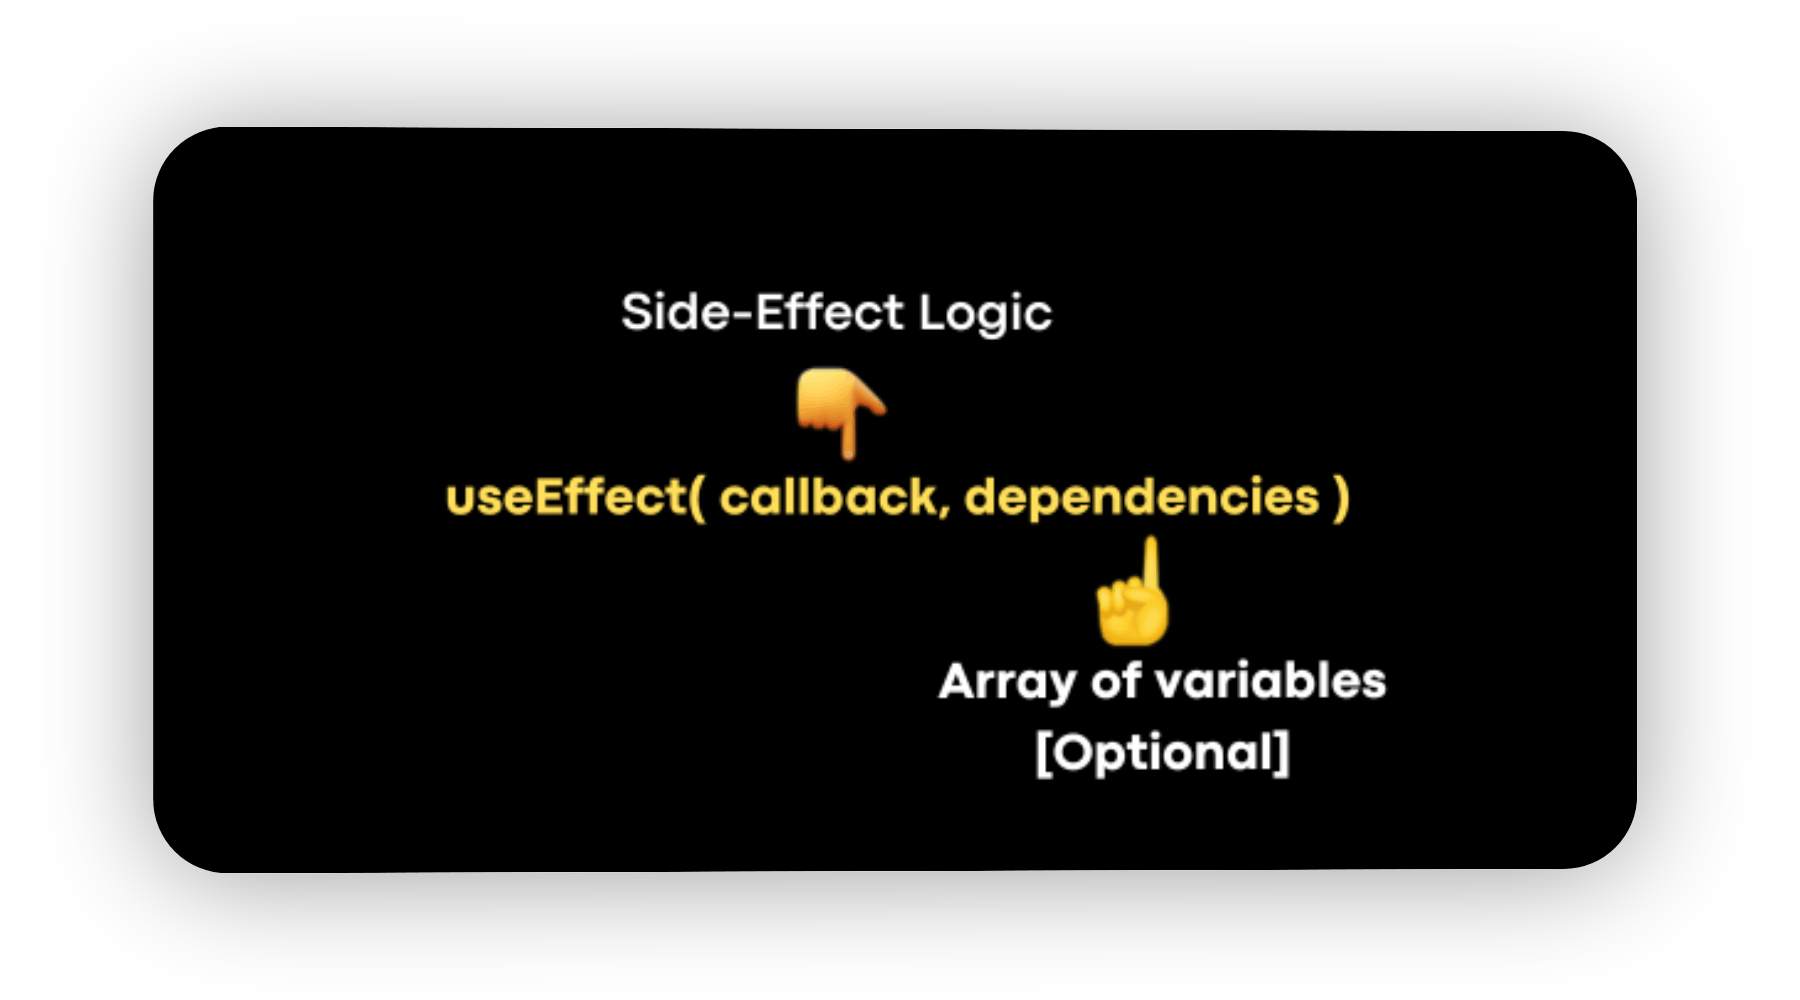
The first argument is a Callback function that contains side-effect logic and it runs whenever there is a change in the component, the second argument is dependencies which is an Array of variables however it is optional.
useEffect runs after every render, whenever the values of one or more variables in dependencies change.
You should use useEffect hook when you want to run code or peform actions after the component has rendered.
Variations of useEffect
with no dependencies
useEffect(fn)when we use
useEffecthook without any dependencies, it will run for every single change in the component
with an empty array as a dependency
useEffect(fn, [])when we use
useEffecthook with an empty array as dependency, then the useEffect will run only when the component gets rendered for the first time and after that, it will never run. "It's useful when we are fetching data from an API".
with an array of variables as a dependency
useEffect(fn, [var1, var2, ...])useEffectruns when the state of one or more dependency variables changes.
Clean-up function in useEffect
A cleanup function is used to return from a
useEffecthook. It's used to clean up or perform teardown operations when the component unmounts or when the dependencies specified in theuseEffectarray change.Cleanup functions are particularly useful for tasks like unsubscribing from event listeners or canceling network requests to prevent memory leaks and unexpected behavior.
🌏useContext
Context in React is a mechanism for sharing data or state between components in a tree hierarchy without the need to pass props explicitly through every level of the component tree.
This can be useful for providing application-level data, such as themes, user authentication status, or language preferences, to multiple components without the need for prop drilling.
4 steps to create a context
1.Create a Context
First create a context folder in the src folder. Then in the context fold create a file to store the context logic. Now in this file, you need to create a context using the React.createContext method.
import React, { createContext } from "react";

const ThemeContext = createContext();
Create a context using createContext() and give the context a name, here it is ThemeContext.
2.Provide the Context
Now we have to set the provider, so add Provider to the context. Make children as props to the component and pass the children inside the context provider. Then create a value attribute in the provider and pass the variables/states as values to this attribute, so that these variables can be accessed globally.
import React, { createContext, useState } from "react";

const ThemeContext = createContext();

const ThemeProvider = ({ children }) => {
  const [theme, setTheme] = useState("dark");
  return (
    <ThemeContext.Provider value={{ theme, setTheme }}>
      {children}
    </ThemeContext.Provider>
  );
};

export default ThemeProvider;
3.Create a custom hook
Create a custom hook to access these variables in other components, the syntax of custom hook will be useContext(ContextName) . Now using this custom hook we can access the variables in whichever component we want.
export const ThemeState = () => {
  return useContext(ThemeContext);
};
4.Consuming context
First wrap the main component with the context provider, then we can make use of the global context variable in all of the children and sub-children and so on.
export default function App() {
  return (
    <ThemeProvider>
      <Page1 />
    </ThemeProvider>
  );
}
Now using the custom hook we can access the context variables/states in other components.
const Page2 = () => {
  const { theme, setTheme, changeTheme } = ThemeState();
  //Here ThemeState is the custom hook we created to access context variables
  return (
    <>
      <h2>You are using {theme} theme</h2>
      <p>Change theme using useState method</p>
      <button onClick={() => setTheme(theme === "dark" ? "light" : "dark")}>
        Button 1
      </button>
    </>
  );
};
Here is the complete code of the same. Click on toggle view on the top left side of the code sandbox and navigate to src/context/ThemeProvider.js
😶🌫️useRef
useRef can be used to create mutable variables which will not re-render the component. Also, useRef allows us to access DOM elements.
Syntax

You can create a ref by calling useRef and assigning it to a variable. Inside the useRef we can pass a default value just like useState. Now, this function returns an object that contains a property called current . This object can be stored in a variable. we can access the current property by using the dot operator i.e. var.current
To create mutable variables
Unlike regular variables, values stored in a useRef persist between renders. This means that even if the component re-renders due to changes in state or props, the value stored in the useRef remains the same.
It doesn't cause re-renders. Unlike state (managed by useState) or props (passed from parent components), changes to values stored in useRef do not trigger re-renders of the component.
To access DOM elements
Other common use case useRef is to access and interact with DOM elements directly. You can create a ref and attach it to a JSX element using the ref attribute.
🤺useReducer
useReducer is a react hook that allows you to manage the state of the components. Basically, it is an alternative of useState. The difference is the way we update states. In useState we use setState function to update the state. But in useReducer it's a little more complicated than useState but actually, it will make your code cleaner.
So, useReducer hook is a state management hook in React that is used for managing more complex state logic within functional components.
Here's how the useReducer hook works:
Syntax

Let's see what each keyword is
- Initial State: This value represents the initial state of your component. It's the starting point from which your state will evolve.
const initialState = { cnt: 0 }
- Reducer Function: The reducer is a pure function that takes two arguments: the current state and an action object that describes how the state should be updated. The reducer then returns the new state based on the action.
const reducer = (state, action) => {
    switch (action.type) {
        case 'INCREASE':
            return { cnt: state.cnt + 1 }
        case 'DECREASE':
            return { cnt: state.cnt - 1 }
        default:
            return state
    }
}
- Using useReducer: It takes two arguments: the reducer function and the initial state.
Dispatching Actions:
dispatchfunction sends action to the reducer. An action is an object that typically includes atypeproperty to indicate the action to be performed and, optionally, additional data for that action.In the example above, when the "Increment" button is clicked, it dispatches an action
{ type: 'INCREMENT' }, and the reducer updates the state accordingly.Updating State: The reducer function processes the action and returns a new state based on the current state and the action. React then re-renders your component with the updated state.
Here's another example that requires complex state management:
🐧useLayoutEffect
useLayoutEffect works exactly same as useEffect, also the same syntax, However, there is a crucial difference between the two: the timing of when these effects are executed in the component lifecycle.
useEffectis asynchronous and runs after the DOM has printed on the browser. It's considered as a "post-render" effect.useLayoutEffect, on the other hand, runs synchronously and before the DOM has printed on the browser. It's considered as a "pre-render" effect.
we use useLayoutEffect when you need to perform a side effect that relies on the DOM layout and measurements before the user sees the updated content.
useLayoutEffect should be used sparingly, especially when dealing with potentially expensive or blocking operations, as it can affect the perceived performance of your application. In most cases, useEffect is sufficient for handling side effects and ensuring a smooth user experience. Use useLayoutEffect only when you specifically need to access layout information before rendering.
🧠useMemo
The useMemo hook in React is used to memoize the result of a computation or function, ensuring that the computation is only re-executed when its dependencies have changed.
Memoization is a technique for optimizing the performance of React components by caching and reusing expensive calculations or complex function results.
The syntax of useMemo is similar to useEffect , but useMemo can return a value, whereas useEffect cannot return a value.
Consider an example:
Here the fn helper() runs every time the component is rendered. i.e. here when the theme is changed from black to white or vice-versa, component gets re-rendered, and the helper() fn executes, but the return value of fn will be the same since the num hasn't changed. So, to avoid unnecessary execution of complex functions we use useMemo.
The same example using useMemo:
Here the fn helper() executes only when the dependency num changes. When the theme toggles the component gets re-rendered, but the helper() fn won't be executed in this case, since there is no change in dependency. so using useMemo we can increase the performance of the application.
🦄useCallback
The useCallback hook in React is used to memoize functions, similar to how the useMemo hook memoizes values. useCallback returns functions similar to how useMemo that returns values.
It's particularly useful for preventing functions from being recreated on every render.
React components re-render whenever their state or props change. Without useCallback, functions defined within a component would be recreated on every render, even if they haven't changed.
In the above example when the theme changes, the component re-renders, but the function fn won't be recreated since there is no change in the dependency value. So, by using useCallback we can avoid unnecessary recreation of functions.
🦾Custom hooks
Custom hooks are basically a reusable function. In simple terms, custom hooks are your own hooks that you create for your own use and you can use them multiple times.
For example, you have some logic in which you use one or multiple built-in react hooks and you need to use that logic multiple times in your project. So, instead of writing the same logic every time, you create your own custom hook or function and use it wherever required.
Let's create a custom hook for fetching data from an API
So, You can use multiple hooks and create a custom hook that will help to skip repeating tasks in the project.
Conclusion
Finally, you've reached the end of the article. In this blog, we've taken a deep dive into the world of React Hooks and explored how they revolutionize the way we build React applications.